


Creative Team Member, Suzie shares her Recolor Digital Scrapbook Stitching Tutorial, using UrbanStitchez and UrbanThreadz by Anna Aspnes Designs in Adobe Photoshop.
Note that this tutorial can also be conducted in versions of Adobe Photoshop Elements.

Recolor Digital Stitching Tutorial
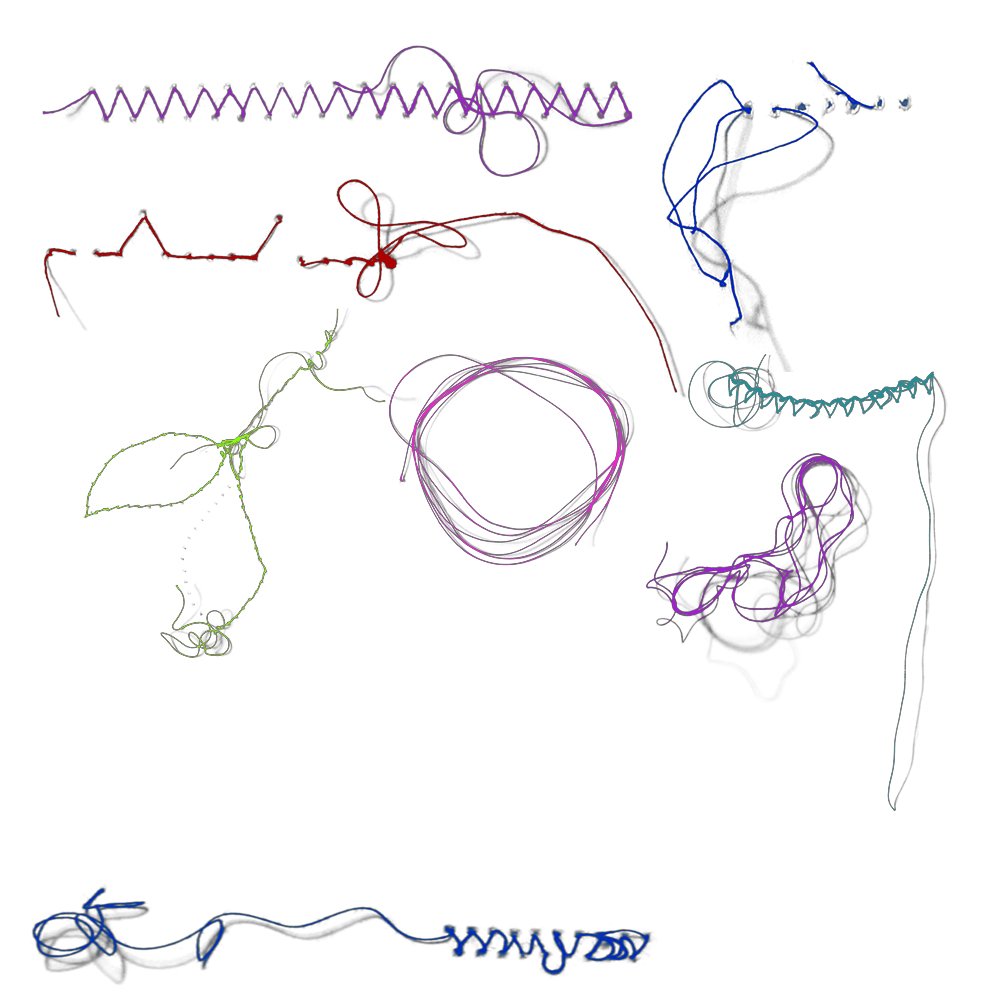
The aA Design Store has a wonderful selection of UrbanStitchez and UrbanThreadz, but they all come in black.
There are multiple ways to recolor elements in Adobe Photoshop and Elements but the black stitching with the inclusion of a gray shadow found in the the UrbanStitchez and UrbanThreadz product range, makes the use of many of these methods problematic.
- Most recoloring methods will change the shadow to the same color as the stitching.
- Black is not considered a color in Adobe Photoshop and Elements and so many of the recoloring methods will not work on black (or white).
- Many recoloring methods require you to pick a color from the standard RGB-CMYK colors.
Today I want to share a recolor digital stitching tutorial that provides a solution to all these problem.
This coloring technique involves the use of an Adjustment layer to change the color of your digital stitching without altering the shadow.
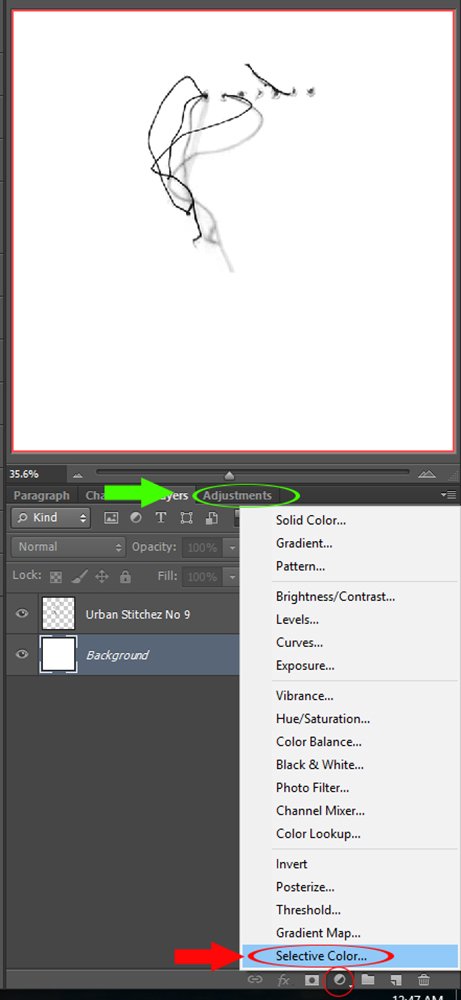
Step 1: Select your UrbanStitchez or UrbanThreadz layer in the Layers panel and then click on the Layer Adjustment Icon (shown below). Choose Selective Color... from the list of options.
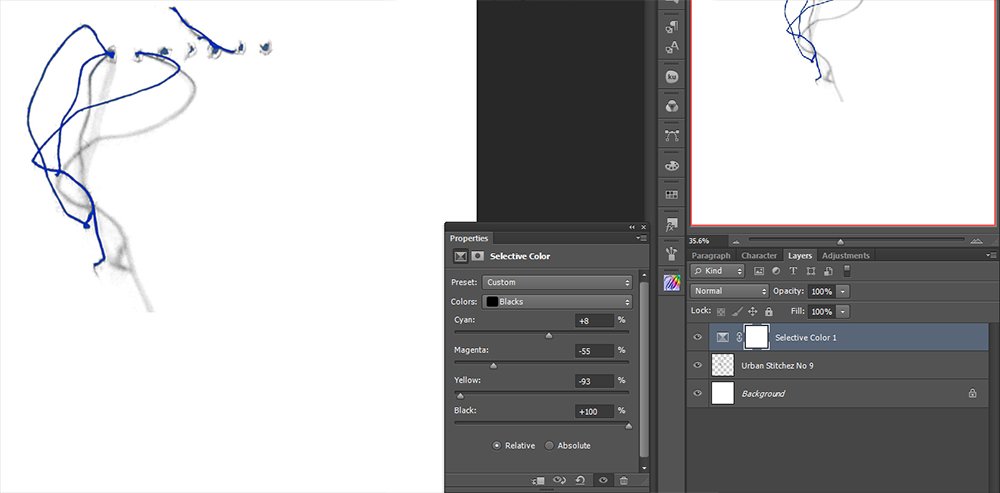
Step 2: Set the Colors option in the Properties dialogue box to Black and then move the sliders to yield preferred shade. Notice the Selective Color Adjustment layer on top of your stitching layer.


Thanks! A nice technique to know!
thanks Suzie for showing this way so the shadow stays black. The only problem I have is to know which slides to move to get a particulair colour, so for me it’s trial and error and lots of patience.
Hahaha yes it takes a bit of practice. It’s opposites if that helps?!
In photoshop elements 14 there isn’t a “selective color” choice in the fill/adjustment layer options. What one do you use for Elements?
Hi Terri I have looked at this and as there is no Selective Color option in Photoshop Elements you cannot complete this tutorial. I will remove Photoshop Elements from the introduction. Thanks for pointing this out and I apologize for the confusion.
Sorry Terri for the confusion. I haven’t got access to PS Elements so I have absolutely no idea! Thanks Anna for the solution 🙂
No problem, was just hoping there was a work around. Thanks
Hi Terri,
I had some time to play today and I have found a work around – It’s a little more fiddly but creates the same result.
Clip a new layer to your stitching layer and set the blend mode to screen. Select a small hard round brush and set your Foreground color to desired shadow.
Now ‘paint’ over the stitching avoiding the shadow. Use the Eraser tool to clean up any mishaps.
Enjoy!
Anna: How kind you are to look into a work around. That is definitely going above and beyond by far! Thank you so much!!
Hi Terri. Happy to help. I’ll be demonstrating this technique in an upcoming event next month.
Hello Anna, I use PSCC and when I clip the adjustmentlayer to the stitch layer… the shadow changes colour! Also merging both layers changes the shadowcolour! Even when I don’t clip it… the shadow does not stay completely black.. there is a hint of colour… (I used the same adjustments as you did in your example).. I don’t know why it does not work for me!
Hi Patricia.
Unfortunately these last steps written under “Notes” don’t work with Adjustment layers. I apologise for this.
An Adjustment Layer must be kept as a separate layer. It is already clipped in effect. If you merge the layers or clip it then it will no longer be an adjustment layer but a solid colour (same happens with drop shadow, etc). Therefore you cannot clip or merge with adjustment layers. Just leave them as separate layers and the colouring should be fine – no perfect at all as it’s black! Black is a nightmare to recolour.
If you want to put something above the adjustment layer you can and those layers will not be effected.
If you want to put something underneath the stitch layer that new layer will have the adjustment too. However in the case of recolouring, it will only effect things that are coloured (in this case) black. So a blue button wouldn’t be effected but a black one would.
I did this tutorial as recolouring anything is easy except when it is black. Black is a nightmare to recolour because it is not a colour, because you cannot lighten or darken it and you cannot adjust the colour or add a colour. I also wanted to keep the shadow and most recolouring (colour overlay, etc) will recolour the shadow too. This is the only way (as far as I am aware) to recolour black and keep the shadow as dark grey. it is not perfect at all and is a problem if you need to put something else black under the adjustment layer.
To overcome this, do not merge or clip but make a composite image (like a jpeg of the whole page) of just the stitch and the adjustment layer and paste it onto your page. Note the background should be white. It is a bit of a pain but on the rare occasions you need to do it, this for me is the only way:
To make a composite image Ctrl/Cmd+Alt+Shift+e
Turn off your stitch and adjustment layers
With the new composite image, change blending mode to Darken – play around with it as not all colours will suit darken.
I hope this helps. Once again my apologies for the error. I hope this explains things a bit better.
Please feel free to ask any questions.
Suzie
x
thank you for the explanation Suzie! I will try it!