
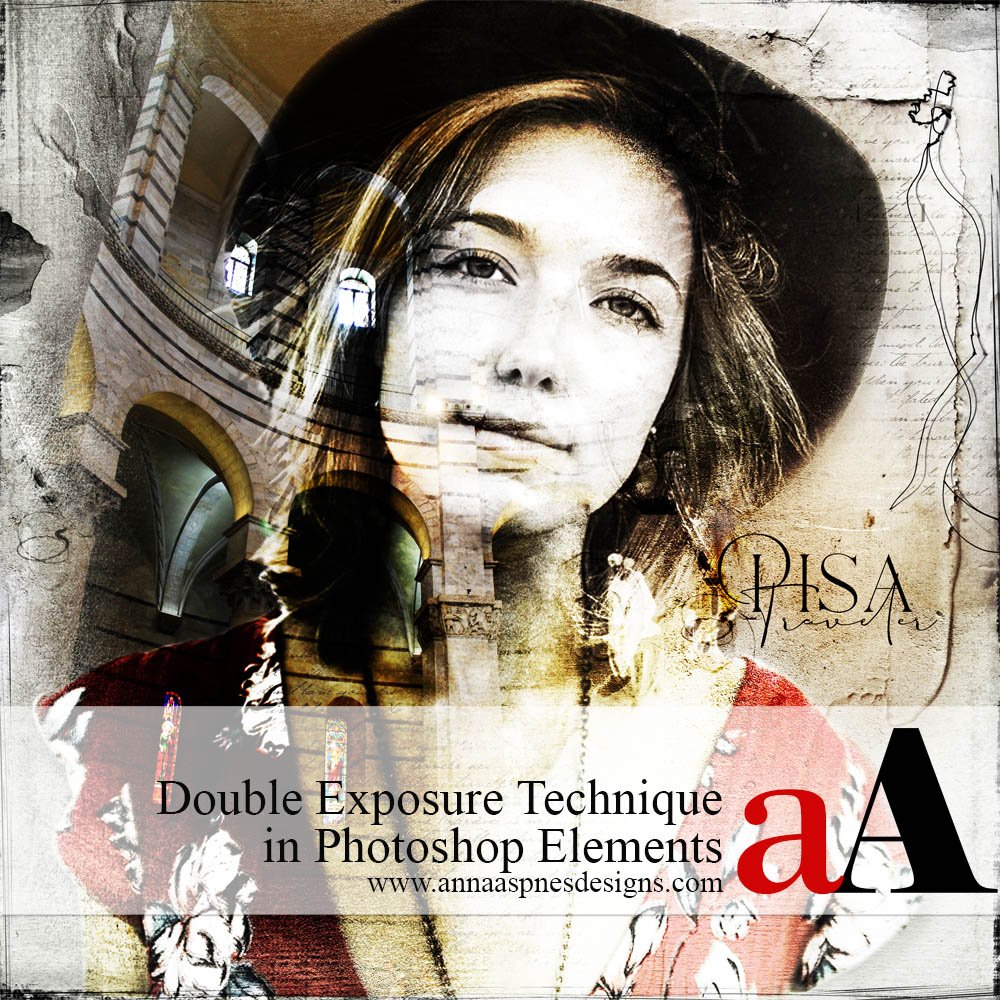
Today, Creative Team Member, Nancy, is sharing her technique for creating Double Exposure Technique in Photoshop Elements.
Double Exposure Technique in Photoshop Elements
Introduction
A Double Exposure is the blending of two or more images in an artistic design.
You will learn:
- How to create an EXTRACTION in Photoshop Elements.
- Apply Blending Modes to combine 2 photos and create LIGHT and COLOR effects.
1. Establish Foundation
Create a New Layout and choose the photos you want to use for your Double Exposure

- Go to File> New (File) and create a New Layout at 12 X 12 inches (3600 px X 3600 px) at 300 DPI/PPI.
- Select your images via File> Open and then click on each photo to open into your workspace.
Tips.
- Consider using thematic images with colors that are similar or contrasting.
- A profile portrait is a great place to begin.
- Remember silhouette portraits cut from black paper.

Note. The selection for this design includes one abandoned design and a portrait.
2. Make Extraction
Remove the background of the photo to yield the subject only.
Note. You can use the Magic Wand Tool or a Layer Mask to create an extraction.
Magic Wand Tool Technique
- Select the Magic Wand Tool from the Tools Panel.
- Click and drag on the background of the portrait photo to remove sections of the background.
- Notice how the areas selected appear with a broken line.
- When you are happy with the area selected then press the DELETE key on your keyboard.

Note.
- This is known as a Destructive approach and therefore NOT easily editable.
- It works well for solid areas of color with clear delineation between the subject and background.
Layer Mask Technique
- Select the photo layer in the Layers Panel.
- Apply a Layer Mask by clicking on the ‘Add Layer Mask’ icon at the top of the Layers Panel.
- This icon appears as a black square with a circle inside.
- Notice a ‘white mask’ thumbnail appear linked to the right of the photo layer.
- Ensure the Foreground Color is Black and the Background Color is set to White in the Tools Panel.
- Click intentionally on the ‘Layer Mask’ thumbnail to select and notice a blue box surround the selection.
- Select an AnnaBlendz Artsy brush and paint on the thumbnail in Black using the Paint Brush Tool from the Tools Panel.
- Adjust the Size and Opacity of the brush as needed.

Note. As you paint on the Layer Mask areas of your photo layer will become hidden.
Tip. Apply a Drop Shadow Layer Style to the extracted subject to add dimension.
3. Apply Blending Modes
Blending Modes adjust how layers interact with one another in the Layers Panel.
- They change the depth of COLOR and enhance LIGHT properties.
- In other words, some REVEAL and brighten while others CONCEAL and darken.
- Find the Blending Modes menu under the ‘Normal’ tab at the top of the Layers Panel.
You can apply Blending Mode to different layers to yield INFINITE effects.
- Experimentation is VITAL when applying Blending Modes to your digital elements.
- The application of MULTIPLE Blending Modes will layer one effect on top of the other and effect all underlying layers in the Layers Panel.
- Use them the achieve Balance, Repetition, and Movement in your digital scrapbooking or photo artistry layout design.

4. Embellish Your Design
Double Exposures need only simple embellishments to complete.
- ScriptTease brushes were added to create a journaling effect.
- UrbanThreadz add dimension mirroring the texture in the paper.
- Color adjustments were made via Enhance> Adjust Color> Hue and Saturation.
DigitalART Supplies
Find a complete list of Digital Designs used in this digital scrapbooking/photo artistry layout here.
Summary
Use these Extraction and Blending Mode techniques to blend 2 or more photos in your digital scrapbooking and photo artistry layout designs.
- Select 2 or more photos and be mindful of the background of each subject.
- Use the Magic Wand Tool or a Layer Mask and Brushes to extract the focal points of one or more image.
- Apply Blending Modes to achieve the Double Exposure effect.
See also:
- Learn more about Design Principles and Element Properties.
- Read Extractions and Color Balance in your Digital Scrapbooking
- Watch Evenfall into Layers of Blending Modes video.
And if you enjoyed this how to create Double Exposure Technique in Photoshop Elements post, please consider sharing using the social media buttons below.

3 Responses
Great techniques, lovely image!
Happy you enjoyed Pam.
Thank you, Pam!