

Miki, shares some Food Themed Digital Scrapbook Inspiration in this tutorial post.
This tutorial may also be followed using Adobe Photoshop.
Food Themed Digital Scrapbook Inspiration
Love to cook? Love to photograph the food you cook? Love to dine out? Have a story or experience about food?
This tutorial shows you how a FotoBlendz Clipping Mask can transform your food photos into digital artistry and scrapbooking masterpieces.
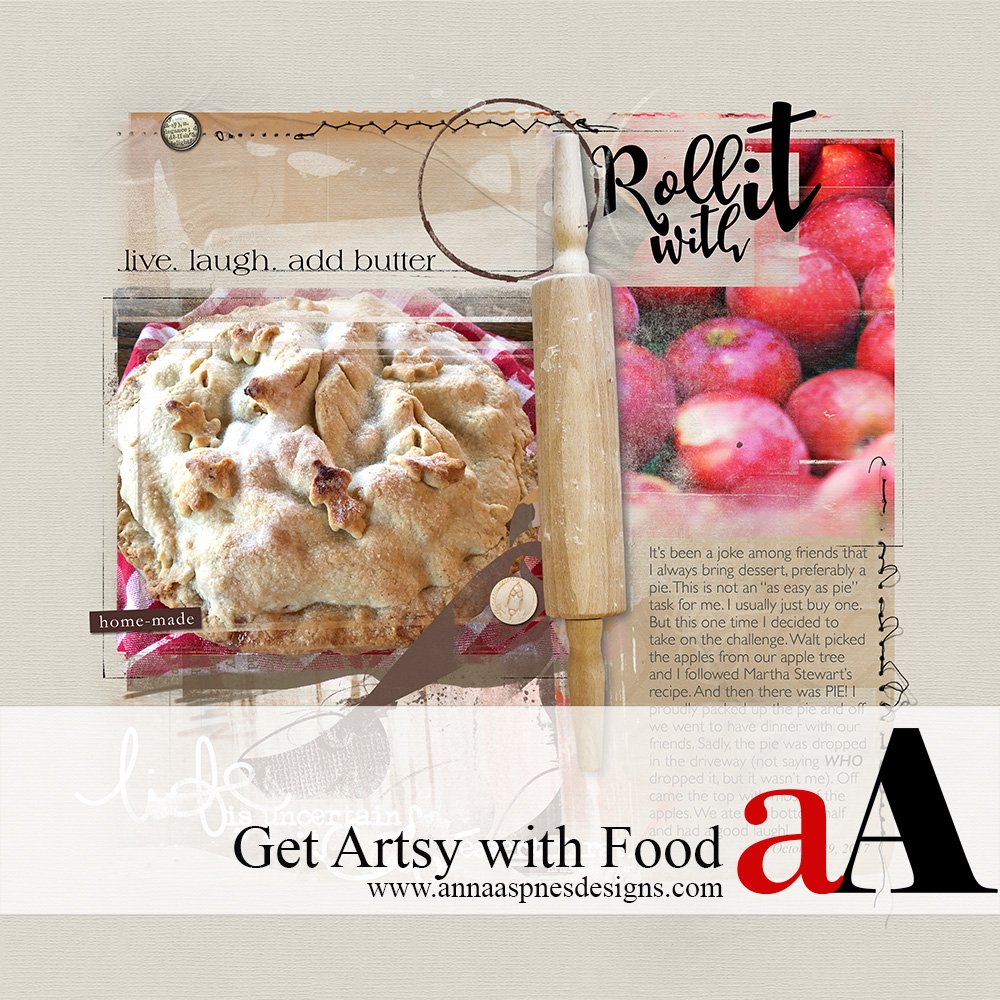
The story behind my layout is about me baking an apple pie and my husband dropping it on the driveway. There might be another story soon about him stopping the car quickly and the lasagna sliding off the back seat and ending up on the car floor on its side.

1. Create a Foundation.
- Create a New Layout at 12 x 12 layout 300 dpi, by going to File> New.
- Open and move the digital paper of your choice onto the layout using the Move tool from the Tools panel. SolidPaper1.jpg from Artplay Palette Delicious was used for this page.
- Add a clipping mask from 12 x 12 Page FotoBlendz No. 5, and resize as preferred, to create a foundation for the photos and design.


2. Build Color and Textures.
- Clip a pattern paper from Artplay Palette Delicious to the 12 x 12 Page FotoBlendz No. 5
- Layer Transfers/Overlays from the same ArtPlay Palette over the paper and mask.
- Apply these layers to the Clipping Set, by selecting them all in the Layers panel, then press CTRL/CMD + ALT/OPT + G to clip them to the paper.
Note that Transfers placed on the left side of the page enhance visual division in the design.

3. Add Photos.
- Clip the a photo (apples) to the same Clipping Set i.e. the chain of clipped layers.
- Apply a Layer Mask to the photo layer. Go to Layer> Layer Mask> Reveal All and use the Gradient Tool to mask the edges of the photo to improve the blending.
- Add a mask from Framed FotoBlendz No. 1.
- Clip a second photo (pie) to the mask.
A secondary photo placed on the opposing side of the page creates visual interest and balance.

4. Color and Depth via Brushes.
- Clip ArtsyPaper2.jpg from Artplay Palette Delicious to a brush from Kitchen Utensils No. 1.
- Move the paper layer over the brush using the Move tool to find best color and texture fit for the selected brush and overall design.
Notice how this technique dimension quickly and easily to the page.

5. Embellish.
- Look for areas of ‘white space’ to place your words, or even a recipe.
- WordART provides a simple title for the layout.
- Textures, Brushes and ArtsyTransfers add depth and interest.
- MultiMedia Elements can be aligned with the edges found within your design.
Embellishment completes the composition the page.

Summary.
In this tutorial, you have learned how to:
- Create a foundation for your page using a FotoBlendz Clipping Mask.
- Clip multiple DigitalART and image layers to a mask to form a Clipping Set.
- Mask a photo that is part of a Clipping Set to improve blending using a Layer Mask and Gradient Tool.
- Use multiple FotoBlendz Clipping Masks to add more photos and enhance the visual interest in a composition.
- Add different kinds of embellishments to your page.
Find more inspiration and join in the fun in the Gallery.
Post your questions about this Food Themed Digital Scrapbook Inspiration in the comments.


Recent Comments