Today we are introducing you to a new ART rePLAY series here at Anna Aspnes Designs.
New ART rePLAY Series
The new ART rePLAY series is a spin-off from the ‘Evolution of an Idea’ series that never really found moment.
In this series of tutorials, the aA Creative Team will be showing an older layouts and reworking them to show you how they made improvements.
Today, Creative Team Member, Miki is sharing her ART rePLAY.

ART rePLAY No. 1
Background. These pages are about learning to adjust to change, finding something new beyond the horizon. A while back my son made a major career change, going from a pilot to a math teacher. It meant that he needed to go back to school and get his Master’s Degree. It was an unsettling time for him and one of the things he enjoyed was sailing.
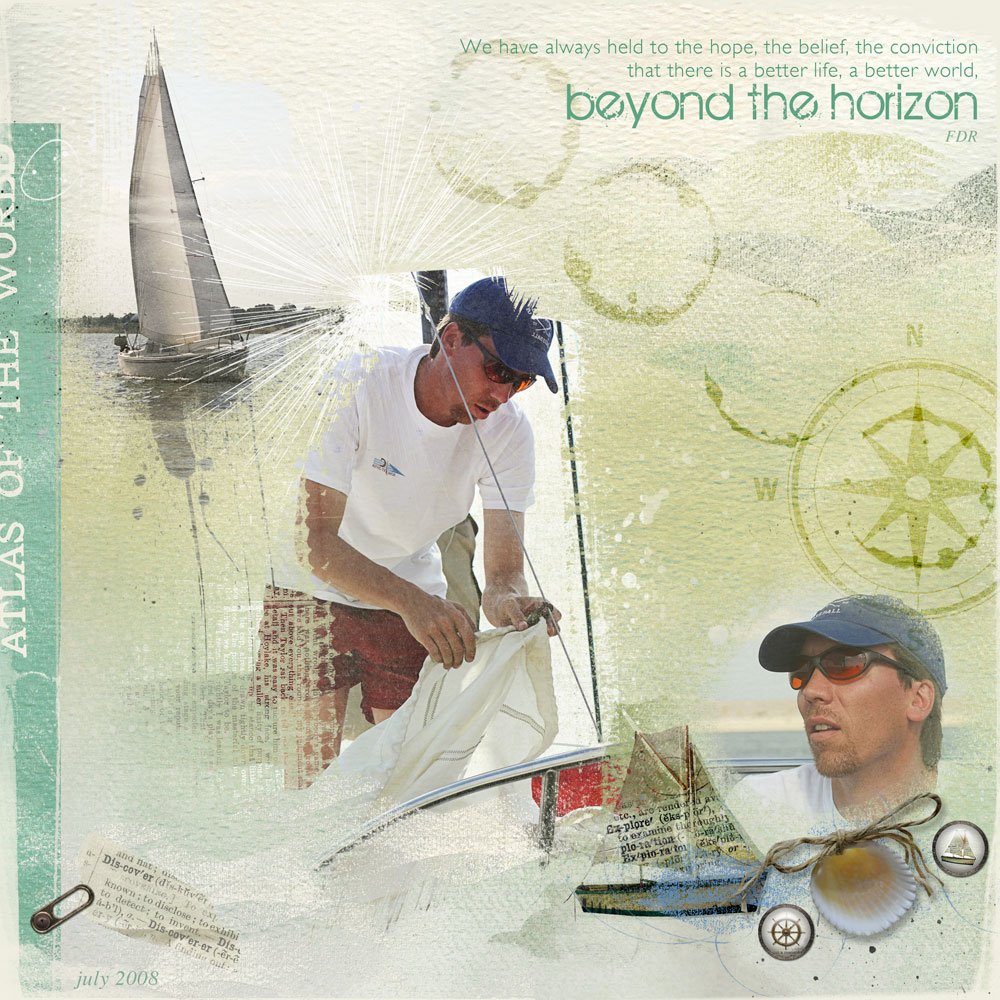
BEFORE.

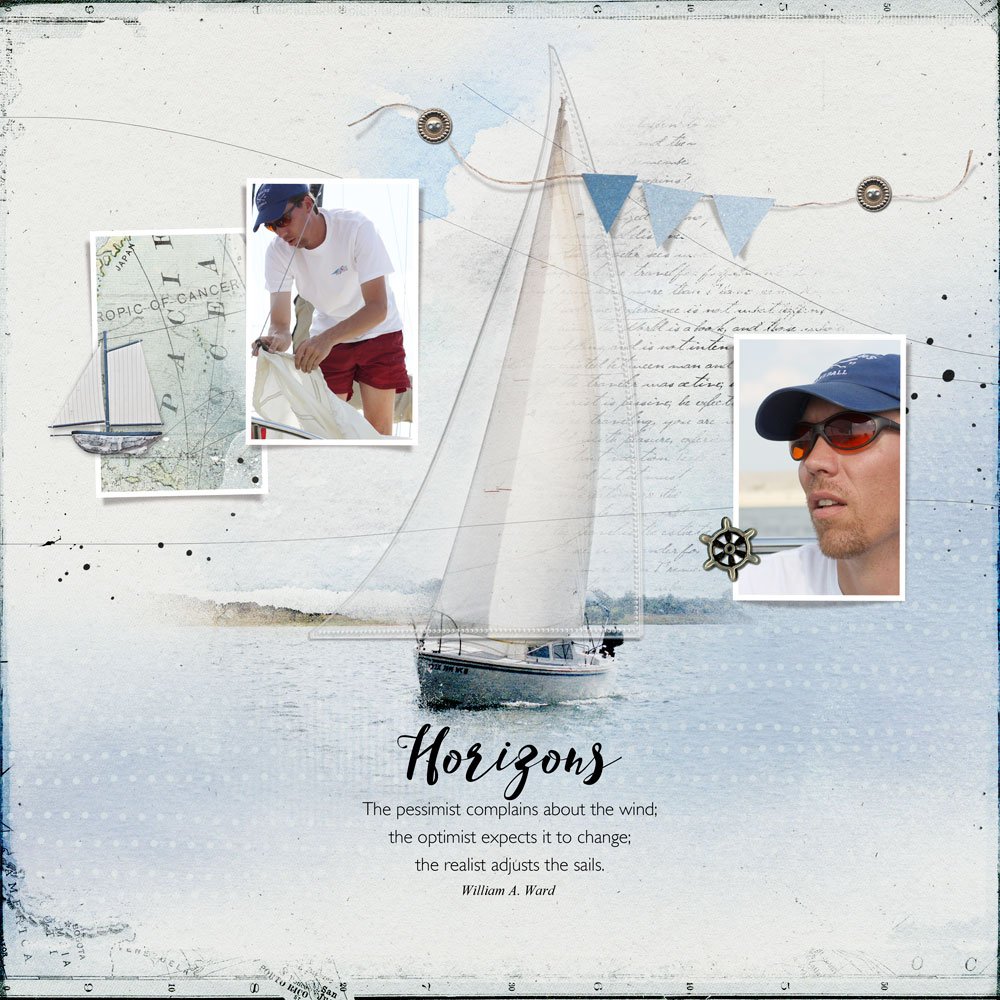
AFTER.
5 Ways to Improve Your Digital Scrapbooking and Artistry Layouts
1. Clear Focal Point. The story comes through more obvious when the page has a defined focal point. This is the place where the eye naturally rests when you look at the design. The BEFORE page, the eye travels to the center photo, but are too many elements surrounding the focal point which detracts the eye. Also note that the photos are similar in size and the eye is distanced too far from the subject matter of the layout. In the AFTER page, the eye is drawn immediately to the sailboat and neighboring title as a result of the bold type in proximity to the larger photo. The frames and embellishments placed around an image also support the composition by framing the the focal point. Try closing your eyes for a couple of seconds, open them, then notice where your eyes rest. This is the focal point of your page.
2. Using FotoBlendz Masks. FotoBlendz Clipping Masks are a quick and easy way to add depth and complexity to your artistry. The photos were not clipped to FotoBlendz Clipping Masks in the BEFORE layout like they are in the AFTER version. Notice how the use of several FotoBlendz Clipping Masks are layered to create a foundation for the design. Try clipping a photo to a mask, duplicating the image, before clipping it to another mask. Also try flipping, rotating and resizing masks as preferred to accommodate you photos.
3. Blending Modes. I was very intimidated by the Blending Modes in Adobe Photoshop when I first started creating digital art, but now I love experimenting with them to add light and depth to my layouts. None were applied in the BEFORE page but in the AFTER page multiple Blending Modes, such Hard Light, Color Burn and Screen, were applied to both the focal photo and FotoBlendz Clipping Masks to create a subtle composite. The advantage, and frustration, of Blending Modes is that you will never achieve the same effect twice. Try out all the options with every photo until you get the hang of them.
4. Artsy Transfers: ArtsyTransfers are so versatile. The .psd file format enables you to use and manipulate the layers as a collection or individually to enhance your layouts. The original version of the focal photo in the BEFORE layout was very gray and lacked color, even after the addition of a Color Adjustment Layer. In the AFTER layout, Several ArtsyTransfers layers were placed over the image to improve color and texture. See Ways to Use Artsy Transfers or Artsy Transfers 101 The Easy Way to Blend Photos for guidance on using ArtsyTransfers in your designs.
5. Color. The ability to change color on the fly is one of the big advantages of creating art digitally. In the AFTER version, a transfer and banner element from ArtPlay Palette Seafoam was recolored blue to emulate peaceful water. The map overlay was desaturated, recolored blue and then blended in the page using the Color Burn Blending Mode. Take a look at the Adjustment Layers Menu where there lots of tools available to help you adjust color. Experiment with Hue/Saturation, Selective Color, or Color Balance.
The AFTER page is stronger it’s design paradoxically providing a sense of calm to the layout.
And P.S. My son liked flying better than teaching.
Stay tuned for more Creative Team insights to be shared in the new ART rePLAY series.


I love what you did here – the after is so beautiful – I love how your eye is immediately drawn in to the sail boat and it blends so beautiful with the rest of the LO 😉
Thank you, Rachael!
wow…great impact…love the changes
thank you
Thank you, Ellen!
It’s so interesting to see how one’s style surfaces and changes. And the impact of emotions expressed in art. Your first design is filled with a bustling energy and some trepidation that one feels before a journey—going into uncharted territory; the second one exudes the calmness that one feels as the journey or goal is almost completed. And how you’ve learned more about yourself during the adventure. The serenity of the latter is portrayed in your colors, the prominence and symbolism of the centered sailboat and your placement of the subtle accents. Thanks for inviting us into your artistic journey, Miki.
Thank you, Christy, for your kind words! Like life, my art journey has been an adventure! Always learning something new!