Today, we’re sharing Linda Davis’ approach to Sketch Coloring with ArtsyTransfers technique.
Sketch Coloring with ArtsyTransfers
Introduction
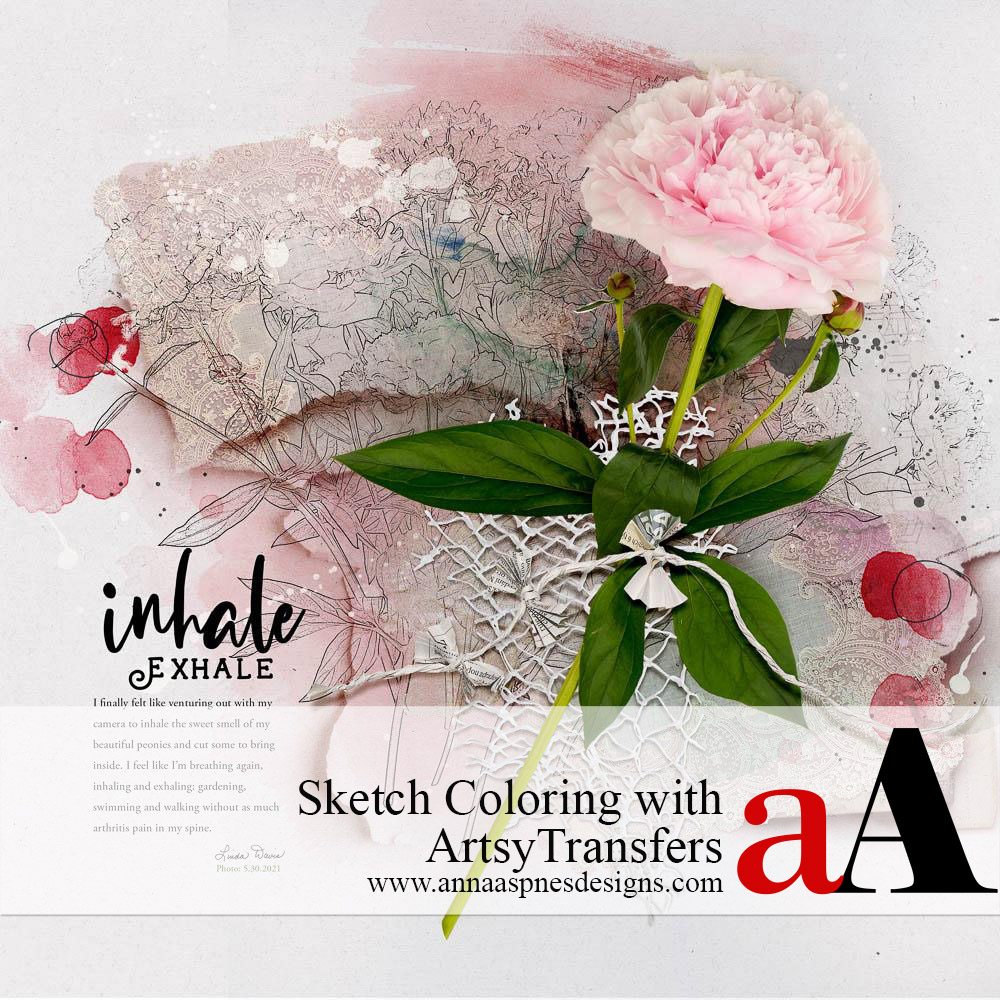
I finally felt like venturing out with my camera to inhale the sweet smell of my beautiful peonies and cut some to bring inside- I feel like I’m breathing again, inhaling and exhaling: gardening, swimming and walking without as much arthritis pain in my spine. It’s especially nice to have a little more energy to get back to creating again.
It’s fitting I think that my first layout after an extended hiatus showcases my beloved Sarah Bernhardt peonies. They are the first to bloom in my garden. This layout uses my favorite creations by Anna, Artsy Transfers, to color a background sketch, create a visual triangle of color and build depth on a layout.
1. Create Layout Foundation
Establish a blank canvas and choose a solid background.
- Create a New Layout at 12 X 12 inches at 300 PPI.
- Open and move SolidPaper2.jpg from ArtPlay Palette Aubade.
2. Sketch a Photo
Choose a flower photo and apply a Photoshop filter to create a sketch image.
- Select a flower image of choice and create a black and white sketch via Filter> Photocopy Filter.
- Duplicate the sketch layer by dragging it to the New Layer icon in the Layers Panel.
- Modify the Blending Mode of both sketch layers to Linear Burn.
3. Extract a Flower
Make an extraction of a single flower from the original photo.
- Use the Magic Wand Tool to extract one bloom from the original flower photo.
- Copy and Paste to a New Layer and ensure the Blending Mode is set to Normal at 100% Opacity in the Layers Panel.
- Make a second extraction and use a Photoshop Default Soft Round Brush to include the flower shadow from the photograph.
- Change the Blending Mode to Multiply at 85% Opacity.

4. Add Transfers
Place Transfers from ArtPlay Palette Aubade.
- Move and place Transfer2.png from the ArtPlay Palette Audade below the flower extraction.
- Change the Blending Mode to Multiply at 50% Opacity.
- Apply a Hue and Saturation Adjustment Layer from the Layers Panel to modify the color of the transfer to better coordinate with the photo extraction.
- Open and position Splatters1.png and GoldPaint.png Transfer files from the ArtPlay Palette Audade to augment the digital scrapbooking layout design.

5. Build a Visual Triangle
Use similar colors from ArtsyTransfers to lead the eye with a Visual Triangle layout design.
- Place all the layers of file #1 from Artsy Transfers Romance below the sketch layers.
- Position a second set of Duplicate layers from file #1 below the first set to create the Visual Triangle using Color.
- Use the Transform Tool to select and flip the layers horizontally.
- Reposition and/or Delete layers as preferred in the photo artistry layout design.
- Use a Layer Mask with Brushes to modify the layers to create variation in the photo artistry layout design.

6. Inject Visual Interest
Add more ArtsyTransfers to create depth in the digital scrapbooking layout design.
- Open and place layers from file #3 fromArtsyTransfer Romance #3 just above the paper.
- Delete or Turn Off the Visibility of the cream paint layers, ArtStroke and floral Transfer in the ArtsyTransfer.
- Adjust the position of layers and adjust the Blending Modes as preferred.
- Place a copy of the ‘pink paint’ Transfer from ArtPlay Palette Romance just above the sketch layers.
- Change the Blending Mode to Multiply at 50% Opacity.
- Place a second copy of the ‘pink paint’ Transfer layer just above the Solid Paper digital scrapbooking layout foundation.
- Change the Blending Mode to Linear Burn at 100% Opacity.

7. Embellish Your Layout
Use elements from the ArtPlay Palette to embellish the focal point of your digital scrapbooking layout design.
- Open and position the ‘net’ element with Drop Shadow layer from ArtPlay Palette Aubade below the extracted bloom in your photo artistry design.
- Place the ‘string’ and Drop Shadow element from the same ArtPlay Palette above the extraction.

DigitalART Supplies
Use these [aalogo] digital scrapbooking and photo artistry assets to recreate this layout design using your own photos and words.
 Summary
Use ArtsyTransfers to color a monotone sketch image.
- Create a foundation using a Solid Paper and a photo with a sketch effect applies.
- Establish a Focal Point with an extracted image.
- Color and embellish with ArtsyTransfers.

