

Linda Davis shares How to Use Texture and ToolSets in Digital Scrapbooking.
How to Use Texture and ToolSets in Digital Scrapbooking
A step by step tutorial in showing how to add texture and dimention using Photoshop brushes in your digital scrapbooking and
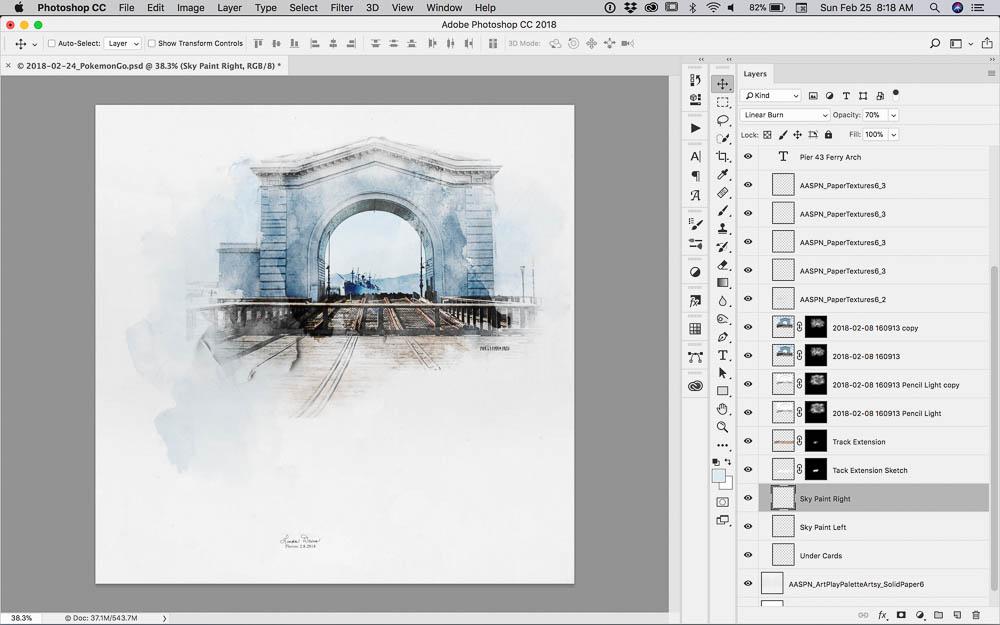
1. Photo Skecth Effect
- Use an app or apply Photoshop filters to create a photo sketch effect.
- Change the Blend Mode to Linear Burn.
- Duplicate.
- Apply an inverted mask and use brushes from ArtsyPaint No. 14 and AnnaBlendz Artsy No. 10.
Note that Topaz Simplify was used to create my sketch, but you can also create a sketch with using the Photocopy Filter.

2. Add Color
Depth and variation in color adds visual interest to your digital artistry.
- Stamp or paint using brushes from the same BrushSet, on inverted masks, to add color from the duplicate photo layers to the sketch.
Apply the following Blending Modes:
- Color Burn at 100% opacity to the top color layer.
- Linear Burn at 100% opacity to the layer below.
The same technique was applied to create an extension of the track.

3. Add Texture
Textures add dimension to your digital artistry.
- Open and move Textures #2 and #3 from PaperTextures No. 6 and position above the photo layers.

4. Support Your Image
Create a foundation for your you photo to create a connection to your chosen background.
- Stamp brushes from ArtsyPaint No. 14 using the Paint Brush Tool on New Layers in a light blue below the photo.
5. Create Custom Embellishments
Use iPhone screenshots as elements to support the theme of your artsy digital scrapbooking.
- Locate or take screenshot on iPhone.
- Import into Adobe Photoshop.
- Resize the images as preferred.
- Apply a Drop Shadow Layer Style to each image.
- Create unity in tying the cards together using #9 file from UrbanThreadz No. 15.
- Poke ball added above the screenshots, was downloaded from the internet, and has a Drop Shadow Layer Style applied.

6. Personalize with an Extraction
Add context by adding a person to the composition.
- Select and image, extract the photo and apply a Drop Shadow Layer Style to create dimension.
Notice that the image was placed just to the right of the card grouping to create unity in the design.

7. Add Words
Words support the visual story and add details to the composition.
- Add words to create your digital scrapbook title and/or journaling.

Post your questions about How to Use Texture and ToolSets in Digital Scrapbooking in the comments.


Wonderful Brushes Anna and very creative tutorial Linda! Thank you!
Appreciate the DigiLove Donna!
Thanks, Linda, for a great tutorial.
Such a beautiful layout! Just pinned this so I can give it a go in the future. Thanks Anna and Linda for the inspiration!
Thanks for letting us know 🙂
She always does such great tutorials doesn’t she?