

Diane Weber shares how to create Digital Scrapbook Pages with Blocked Design Techniques.
Complete these techniques in Adobe Photoshop or Elements.
Digital Scrapbook Pages with Blocked Design Techniques
Introduction
How to Creat Digital Scrapbook Pages with Blocked Design Techniques.
- This approach is reminiscent of Linear paper scrapbooking.
- Divide your layout into smaller design areas or Blocks.
- It can help you create Simple digital scrapbooking pages with ease.
Tip. Select photos with similar Colors for best results.
Note that Diane works in 8 X 10 double-page format, but you can use these Digital Scrapbook Pages with Blocked Design Techniques with your preferred page size.

Blocked Design Intro 1 (Ambages Collection Fly)

Blocked Design Intro 2 (Lake Harriet)
Note. The predominant blues in the above photos capture the viewer’s attention and lead the eye.
1. Select & Crop Your Images/Photos
Create a foundation and select photos you want to use in your digital scrapbooking page.
- Go to File> New to establish a New Layout
- In the dialog box, enter a Width of 17 inches and a Height of 10.5 inches (or your preferred dimensions.)
- Set up Guides – See my previous post on Modifying Square Digital Papers)
- Drag all of your photos onto the page (up to 6-8 photos can be used).

Blocked Design Step 1A
Resize/crop your selected photos.
- Note that many photos will be used ‘as is’ without a frame, so crop to the desired size.
- Select the Rectangular Marquee Tool.
- With the photo layer selected in the Layers Panel, draw a rectangle around the areas to be removed and press the Backspace key on your keyboard.
- You can also select the Custom Shape Tool, place your cursor below the photo in the Layers Panel, draw a (rounded) rectangle, then clip the photo to this new Shape layer.
Arrange your photos on your digital scrapbook page.
- Distribute the photos on your layout, creating Balance in terms of Color and Theme of your photos.
- Notice how the yellows, greens, and blues are evenly distributed across both her 8.5X11-inch pages.

Blocked Design Step 1B
Tip. If any photos with ‘odd’ colors or those that ‘stand out’, you might consider desaturating them.
- Go to Image> Adjustments> Black & White
Or:
- With the photo selected in the Layers Panel, go to Layer> New Adjustment Layer> Hue/Saturation.
- Clip this Hue/Saturation layer to your photo, check the Colorize box, and adjust the Sliders.

Blocked Design 1C Desaturated Images (Self Portraits)
Note. The desaturated photo in the top middle blends well with the yellows and adds visual interest to the digital scrapbooking page.

Blocked Design 1D Desaturated Photos (Notable Minneapolis)
Note. All the photos on the right are desaturated so as not to conflict with the blues on the left.
2. Add Mattes to Your Photos
Use ArtsyKardz behind your images to create mattes or ‘blocks’.
- Position your cursor below each photo in the Layers Panel.
- Drag the .jpeg format file of an ArtsyKardz beneath the photo, positioned like a photo ‘matte.’

Blocked Design Step 2A
3. Layering Embellishments
Add layers of visual interest and embellishment using MultiMedia Documents elements.
- Open the .png version of a MultiMedia Documents elements file.
- Position your cursor below a photo in the Layers Panel.
- Drag in all layers of the MultiMedia Documents.
- Arrange and modify the layers to best support your digital scrapbooking layout design.
Tip. PaperTextures, Transfers and Overlays, Tape and Dimensional Paint elements all offer good options for layering.

Blocked Design 3A
4. Add Your Photo Focal Points
Add framed/clipped photos to the ‘blocked’ and matted areas of visual interest.
- Clip the photo to a FotoBlendz clipping mask, such as from a FotoInspired Layered Template.
- Clip to the mask layer of a Frame from an ArtPlay Palette, Template or Frame.
- Add a Stroke and Drop shadow Layer Style to the photo layer of your digital scrapbooking layout design.

Blocked Design 4 Frame Options (Mississippi River)
Note. Some of these photos are ‘just sitting in’ the background (upper left and right).
- Others are clipped to Frames from a Template (left)
- One is clipped to a UrbanThreadz Frame (right)
- One has a Drop Shadow Layer Style applied (lower right)
5. Enhance Your Digital Scrapbook Theme
Blocked pages have a lot of design elements and need minimal embellishment.
- Keep your dimensional embellishments simple.
- Use Design Principles such as Visual Triangles.

Blocked Design 5A (Beyond Van Gogh)
Note. There are three small flower clusters.
- WordArt, Stitching, and Buttons form a Visual Triangle in this digital scrapbooking layout design.
- A few other small embellishments, like Twigs and Staples, are added for Texture and Functionality.

Blocked design 5B (Alameda)
- Twigs and string elements add Movement to the digital scrapbooking layout design
- The placement of yellow elements forms Visual Triangles to lead the eye.

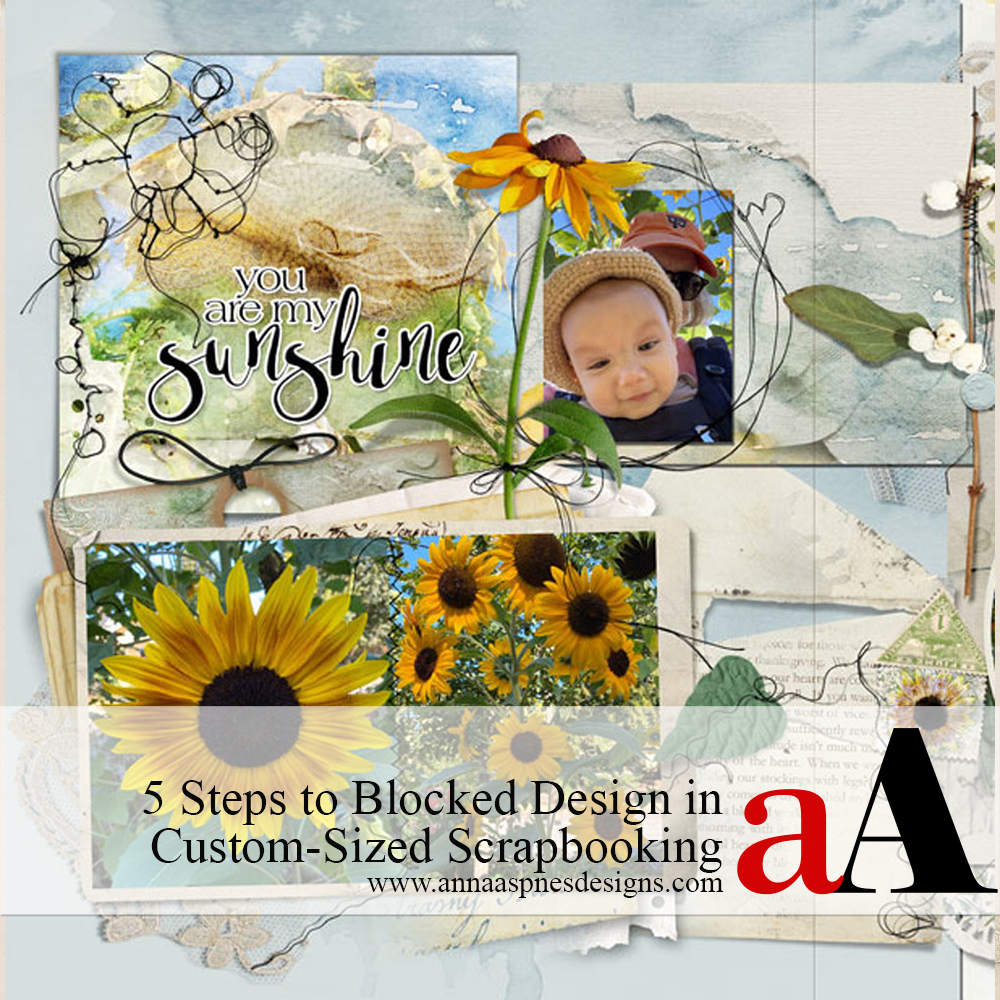
Blocked design 5C (Ambages Collection Blocked Sunflowers)
- WordArt, Stitching, Flowers, Leaves, and Buttons from ArtPlay Palettes and MultiMedia elements are arranged to add Movement to the very Linear Blocked Design.
Summary
You can create a linear blocked design in 5 easy steps.
- Select, crop, and Arrange photos to create ‘blocks.’
- Add background papers and elements to create a Foundation for your digital scrapbooking layout.
- Add Dimension and Visual Interest with element layers.
- Create Focal Points with Clipping Masks and Frames.
- Embellish with your favorite elements and WordART.
And if you liked this Digital Scrapbook Pages with Blocked Design Techniques, please try the technique and post your layout here.


Recent Comments