

Linda Davis shares Artsy Classic Digital Scrapbooking for Adobe Photoshop or Photoshop Elements.
How to Add Artsy Effects to Digital Scrapbooking Pages
Introduction
Learn how to ‘artsify’ more traditional digital scrapbooking layout design
- Blend a photo using a FotoBlendz clipping mask.
- Create Visual Interest with ArtsyTransfers.
- Add Dimension via MultiMedia elements.
The Story
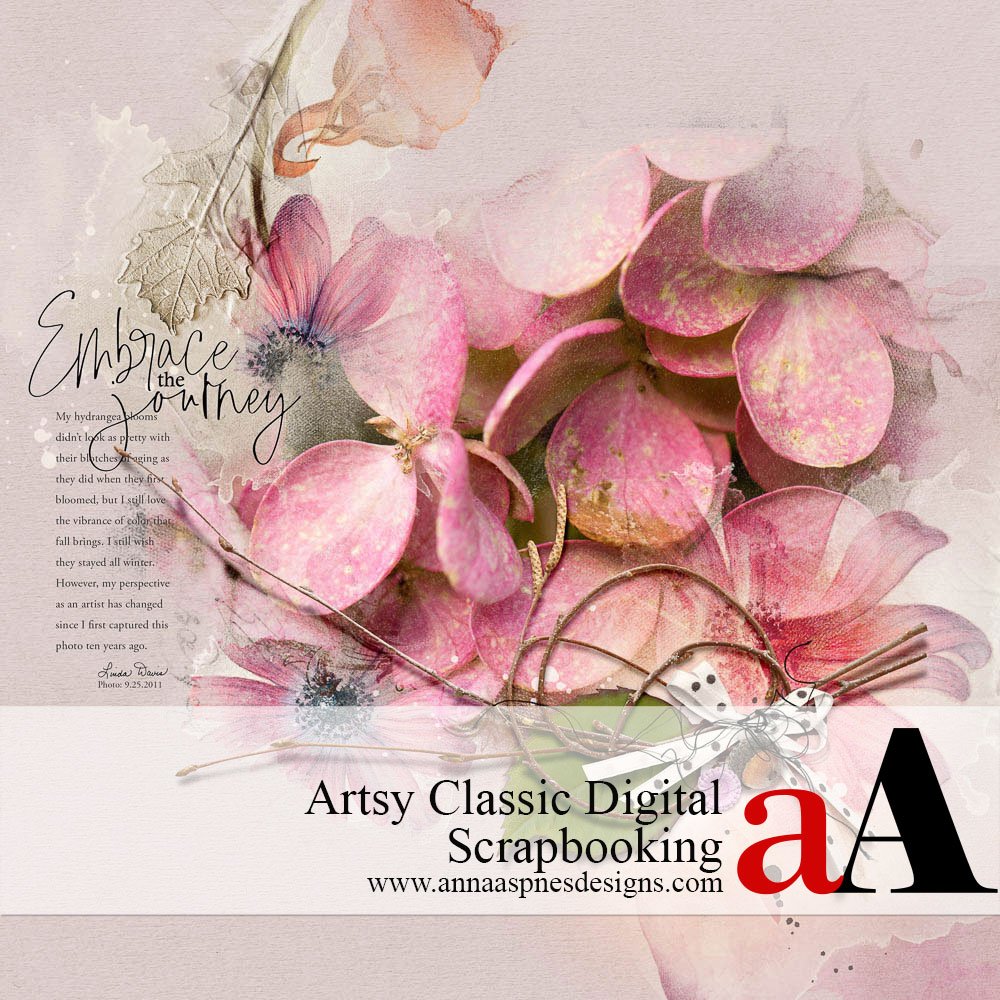
Ten years ago I posted a layout with a photo of hydrangeas from my garden in Anna Aspnes Gallery at Oscraps.
In the description box of my post, I wrote:
“I’m new to using Anna’s artsy things, very unsure of what I’m doing, certainly coming from a more traditional background. So I appreciate the examples here. Photo taken yesterday in my garden. I used Anna’s new kit and paper, ArtPlay Autumn Haze and an overlay from ArtPlay Palette Fall No. 1.” (Please not both these products are now retired.)
- Comparing the old layout on the left in the screenshot below to the one on the right that I just created, it’s evident I’ve changed as an artist over the last ten years.
- I describe my artsy style as classic, but there are many other artsy styles.
- These are some of the characteristics of my style.
- See my blog, photosandstories.com, for other examples of my style.
Classic Artsy Style Characteristics
- Use a solid paper for a simple Layout Foundation.
- Consider Design Principles when creating a page.
- Focus on Blending your focal photo, via custom masking or clipping the photo to a FotoBlendz clipping mask.
- Use ArtsyTransfers to create depth and Visual Interest as well as support page design.
- Add a title in the form of WordART and journaling to provide Context to the imagery.
- Use a MultiMedia element files for easy dimensional ‘cluster’ embellishment.

1. Establish Layout Foundation
Using a solid paper create a ‘clean’ and simple layout foundation.
- Create a new layout via File> New.
- Enter the Height and Width dimensions of 12 x 12 inches at a Resolution of 300 PPI.
- Add Guide lines to the new document as explained in Using Guides in Digital Scrapbooking Layout Design.
- Drag SolidPaper3.jpg from ArtPlay Palette Bountiful to the New Layout.

2. Blend Your Photo
Clip a the photo to a FotoBlendz clipping mask and place the image using the guides.
- Go to File> Open and choose 4.png from Bountiful FotoBlendz Mask No. 1.
- Double click on the file to open into your work space.
- Select the Move Tool from the Tools Panel.
- Click-Drag-Release the mask layer onto your layout foundation.
- Use the Guides to position the mask.
- Open and place the photo layer directly above the mask layer in the Layers Panel.
- The edges of the photo MUST extend beyond those of the mask.
- Select the photo layer and go to Layer> Create Clipping Mask.
- The photo will now Conform to the shape of the underlying mask.

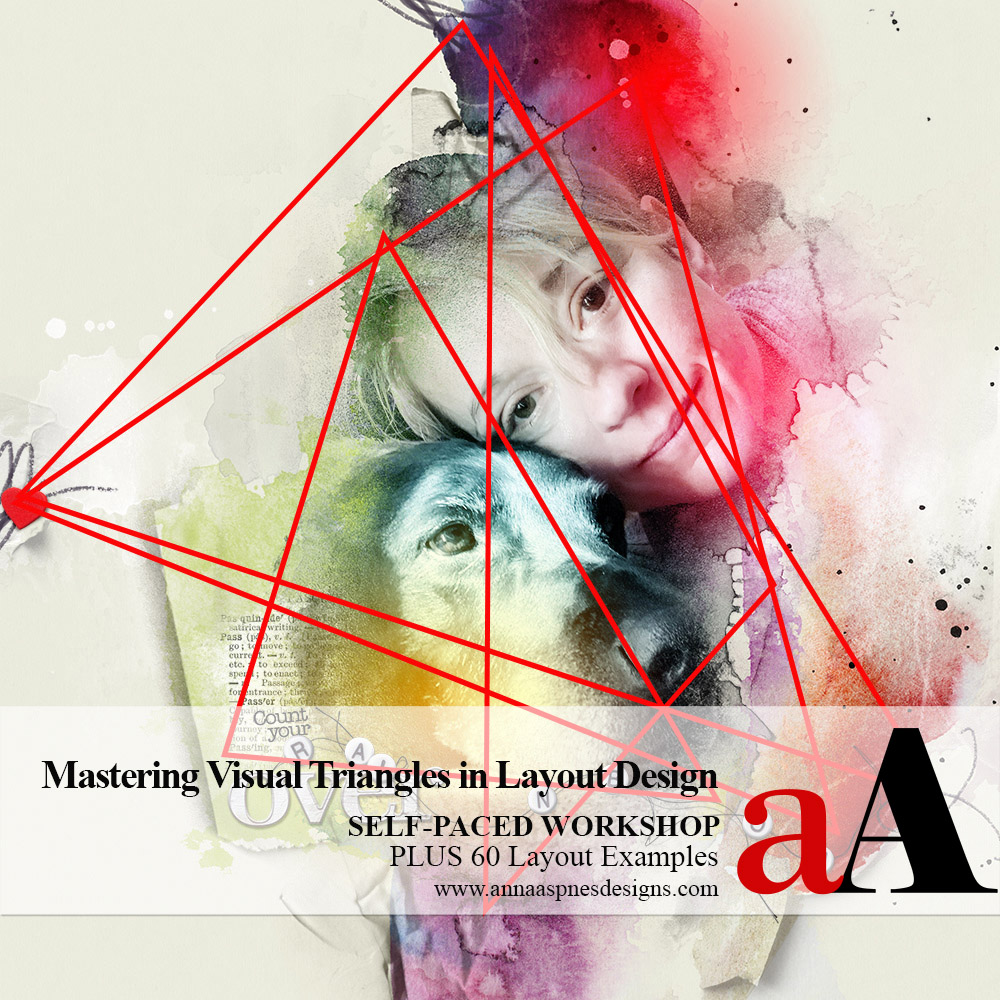
3. Apply Design Principles
Create a Visual Triangle using ArtsyTransfer layers.
- Place the layers of 5.psd from Artsy Transfers Bountiful on top of the mask and photo layers.
- Press the keys CMD/CTRL + G to Group the layers in a folder in the Layers Panel.
- Move the layers to the top left area of the layout deign using the Grid to adjusting their position.
- Turn off the Visibility of any of the ArtsyTransfer layers by clicking on the ‘eye’ icon to the left of each layer in the Layers Panel.
- Place the layers of 1.psd from Artsy Transfers Bountiful on the bottom right of the layout.
- Repeat the Grouping and adjusting Visibility of layers.
- Use the Grid once again to place FlowerTransfer1.png from ArtPlay Palette Bountiful as shown.
- Duplicate the transfer by dragging the layer(s) to the New Layer icon in the Layers Panel to intensify Color.
Note.
- The Visibility of the ‘text’ layer from 5.psd from Artsy Transfers Bountiful was turned off.
- The white transfer layer was Turned Off and the paper layer Repositioned from 1.psd from Artsy Transfers Bountiful.
- The Clipping Set (masked photo) was also turned off for this screenshot so that you can see the transfers are positioned According to the Grid.
- Linda placed the transfers Between the Solid Paper and blended photo layers.
- The layers were essentially ‘tucked’ behind the image to Build the Artistry and enhance the Blending Effect.
See also:

4. Augment with Words
Add a title in the form of WordART and journaling to provide Context to the imagery.
- Place title file from Bountiful WordART Mix No. 1 to the left of hydrangeas.
- Select the Type Tool from the Tools Panel.
- Click-Drag-Release diagonally to create a Text Box.
- Highlight the default text and begin typing to replace with your own words.
- Reposition the text box with your journaling below the title.

5. Embellish with Dimension
Add a MultiMedia element for easy embellishment and add realistic dimension to the digital scrapbooking design.
- Open file 2.psd from MultiMedia Bountiful No. 1.
- Click on the top layer of the Layers Panel.
- Select the Move Tool from the Tools Panel.
- Select ALL the MultiMedia layers in the Layers Panel and move them to the layout foundation.
- Notice that the layers are introduced directly above the layer highlighted in the Layers Panel
- Group layers into a folder and reposition over the blended photo as preferred.

Summary
Combine simple approaches with artsy digital scrapbooking supplies to create a twist on traditional style digital scrapbooking layouts.
- Choose a simple Solid Paper as your layout foundation.
- Blend your photo using FotoBlendz clipping masks and ArtsyTransfers.
- Use strong type to provide Context to your imagery and Dimension via MultiMedia elements.
Embrace your own journey to find your style.
Take some time to look back from time to time to see just how far you’ve come as an artist.
If you like this How to Add Artsy Effects to Digital Scrapbooking Pages post, try this approach in your next photo artistry/digital scrapbooking layout design, and share your layouts in the AnnaGallery.


Recent Comments