

In this series of tutorials, the aA Creative Team members are reworking older layouts to show you how they made improvements. Today, Creative Team Member, Barbara is sharing her Before and After ART rePLAY No 6.

ART rePLAY No 6.
Background. Sometimes a layout just doesn’t come together the way we would like and this was one of them for me. I disliked the design, and for whatever reason, I couldn’t seem to come up with something better at the time. I thought I would give it another go for this tutorial and share some of my thought processes and hope it is of help to you.
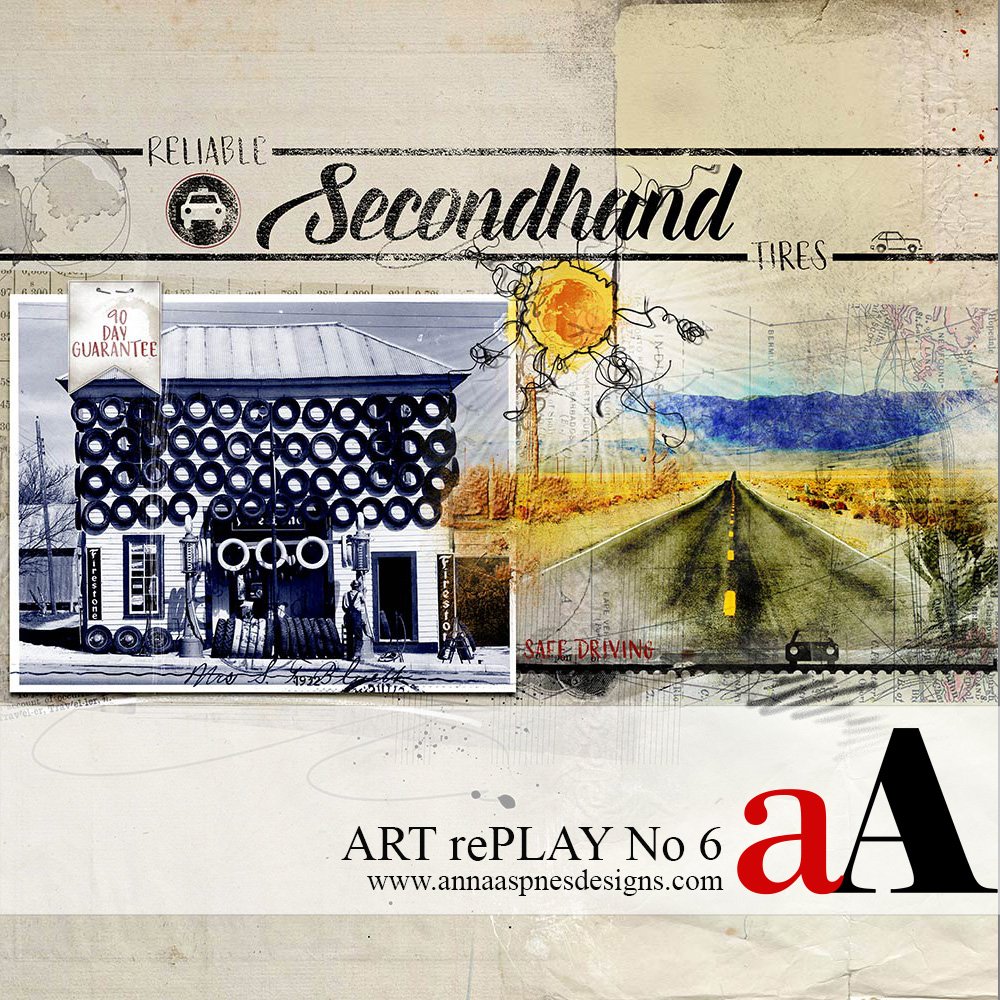
The reason behind this layout was the old 1932 photo with the tires on the outside of the building and the precise order with which they were hung. I tried finding out how much secondhand tires cost in the thirties, but found only the price of new tires. $3.69.
BEFORE.

AFTER.

Improve Your Digital Scrapbooking and Artistry Layouts
A Clearer Thought Process. The pattern of the tires are very linear so I decided to go with that design for the revision and make the page look a bit aged. The lonely highway was important to me because so many people made the trek across the country, looking for work and hopefully a better life in the Depression. Also, I wanted to stick with ArtPlay Palette Globetrotter that I used in the original, but I ended up dipping into ArtPlay Palette Traveler also.
In the original the background paper was too new looking for me, so I changed it to an aged paper from Traveler and liked it so much better.
Using Brushes and Blending. After bringing in the black and white photo and placing it, I brushed in the photo of the highway with a reverse mask and a technique I learned from Anna’s Advanced Brush class next to it, overlapping just a little, giving it a wonderful mottled look. I duplicated that photo and applied the Color Burn Blending Mode to give it that old over-saturated postcard look and taking away that flat look of the original.
Using the same transfers from the original, I placed those underneath the photos, blending them into the background paper. I also used the cactus from the original and again placed those along side the highway and applied Color Burn and Linear Burn Blending Modes.
Title Work. Continuing with the linear look, I went with a title design I saw on a book cover that I loved. The lines were created on separate layers with a hard round brush after typing out the words on three separate layers so I could move them individually. Then using the Rectangle Tool on each line layer, I deleted the part going through the words ‘reliable’ and ‘tires.’
The Detail Work. After all the elements were in place, It was time to do some roughing up on the page to give it a little aged look. Using the ‘Blend Ifs’ on the title, which I often do, so the words don’t look like they are floating on the page. Where the Blend Ifs didn’t work, I used a layer mask and AnnaBlendz Brushes to rough things up a little. For example, on the ’90 Day Guarantee” tag over the photo.
Using Color Overlay. Going back to the black and white photo, I used a Color Overlay, taking the blue color from the mountains in the highway photo, applied the Color Burn Blending Mode and reduced the opacity. That gave the photo a little richness. I also added scratches to the photo with a brush from SandScratched ToolSet.
In Conclusion. I think the eye moves much better over the revision with this cleaner design, giving the eye a resting place in the much needed white space. I find when I am having trouble creating a page, its because I am not clear on the story I want to tell. I think this comes across as a much improved layout.
Click on the above image to see digital supplies used in Before and After ART rePLAY No 6.
Stay tuned for more Creative Team insights to be shared in the Before and After ART rePLAY series.


Really loved your first page, but I can see the areas now that you wanted to improve. Thanks for the great explanation. Your revision is extraordinary!!